[ad_1]
To make a robot, be it a wheeled rover, flying drone, factory robot, or autonomous spacecraft, you will need common classes of components. We’ll discover what they are for, focusing on those needed for a wheeled robot.
We’ll look at what options there are for the components, and how we might be able to save money. We’ll go through the trade-offs needed for these options, the tools you might need, and their relative difficulty.
This article was written by Danny Staple and first appeared in The MagPi 84. Get a free Raspberry Pi computer with a 12-month subscription to The MagPi.
Danny makes robots with his kids as Orionrobots on YouTube, and is the author of Learn Robotics Programming.
Using Raspberry Pi to control a robot
Any robot starts with a computer to run code, using sensors to collect data about the world. There are output systems to drive motors and actuators to affect the world. It needs power systems to get the right voltage and current to the right parts. The robot will need mechanical parts for the motors to drive, along with connecting the sensors and a body holding it all together.
An overview of robot parts
To make a wheeled robot, you are going to need some common part types to make it work:
- A chassis or body to hold everything together. You will need brackets for sensors eventually, too.
- Wheels and motors to drive them. This includes balance wheels or castors.
- A main controller to run your code: Raspberry Pi.
- A motor controller or driver to connect your Raspberry Pi safely to outputs.
- Batteries and power regulation for your electronics.
- Sensors to get data from the real world, like distance sensors and a camera.
You can pick up most of the parts for a low-cost robot with a kit. See Build a robot with CamJam EduKit 3 for more info.
Here are some other kits
Going low-cost with robotics parts
To go low-cost, you going to have to be a little creative. This will mean substituting parts, or finding parts that may not be the obvious choice.
You will be able to save by shopping around, and waiting for parts that will take longer to ship will usually reduce cost.
Having parts pre-soldered or ready-made usually adds quite a lot to their cost, so be prepared to solder things together for the electronics, and to bodge or repurpose things for the body.
Robots can be made of anything, although we’re not advocating it; we’ve even seen a robot made with vegetables for a body and wheels.
Tip! Get creative and repurpose
Be on the lookout for unused brackets and plastic shapes that might be handy to use in robot builds.
Pick the right Raspberry Pi
The robot needs a Raspberry Pi to run your code. How would you save here? Well, the first cheapest Raspberry Pi is the one you already have! Make sure it’s one with wireless LAN and a 40-pin header if you can (Raspberry Pi 3, 4, and Zero W models are all good choices).
Our favourite low-cost, and low-space, option is Raspberry Pi Zero WH. This is the smallest model, with wireless LAN and a GPIO header pre-soldered to the board. Since a robot isn’t often connected to the screen, the lack of DSI port shouldn’t be a problem. If you have a Raspberry Pi Zero W, then soldering pins to the GPIO header is a fun project.
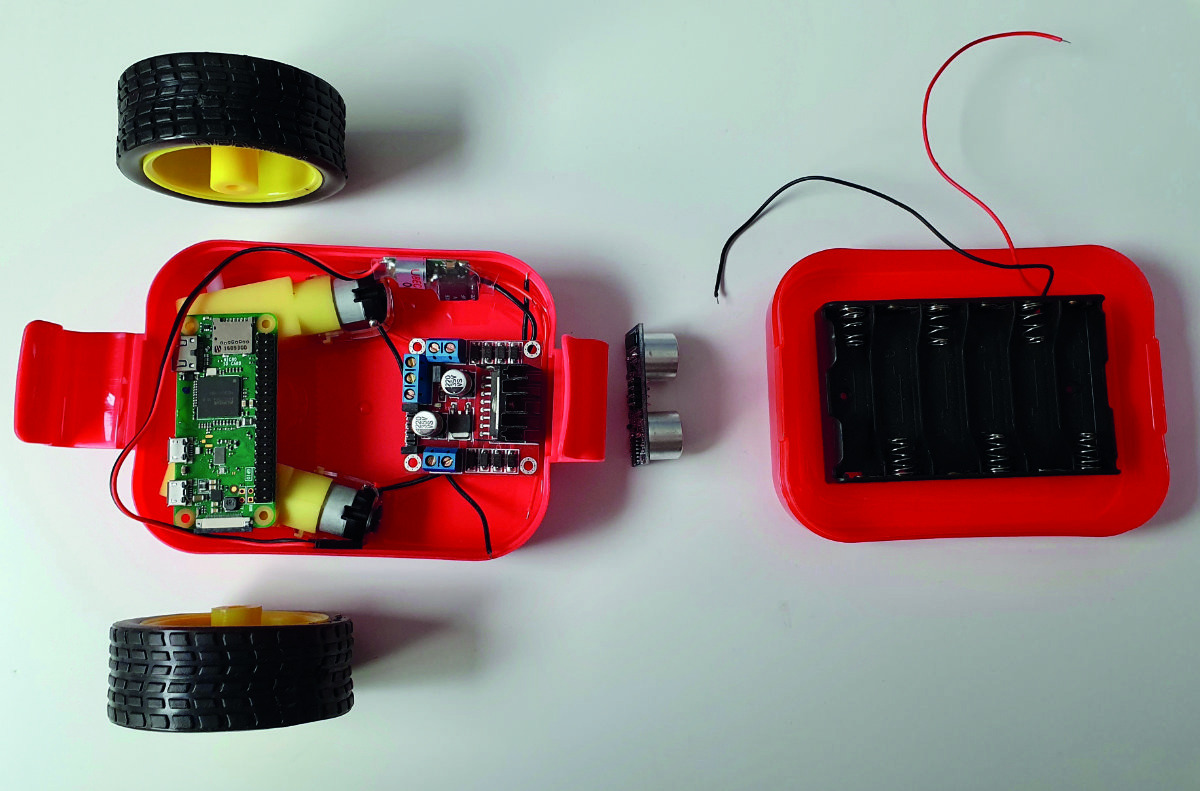
Choose a chassis or body
The chassis holds the robot together. It’s a fundamental decision on how your robot is made. Options for a wheeled chassis are:
- Easy: A laser-cut chassis. These are cheap to buy and easy to work with. They have space to extend the robot. They can be flimsy and do break, but are the simplest option and do not require much in the way of tools and time. If you go for a kit, a two-motor variant is advisable. Not as much fun as the lunchbox option.
- Easy: Adapt a lunchbox. This does require a little measuring and drilling of holes, but is still quite an easy option in terms of construction. You will need to choose smaller parts to fit in the lunchbox.
- Intermediate: Cut a chassis from wood or sheet material. This requires access to woodworking tools and CAD/drawing skills.
- Intermediate: The toy hack! One of our personal favourite options is taking a cheap motorised toy and swapping its electronics for a Raspberry Pi and motor board.
- Hard: No chassis at all. The least cost for a chassis is not to have one and go for a free-form robot, strapping motors directly to control boards and batteries. This is a lot of fun, but takes experience and practice. Cable ties may be all you need to buy for this.
A good first robot is option two, the lunchbox robot. It’s a good compromise of saving cost and complexity, it’s fun, and has a little bit of character. So that’s what we’re making here.
Robot wheels. Not reinventing the wheel
Drive wheels will be attached to your motors. For a low-cost robot, two driven wheels is a good number.
Unless trying to make experimental robots, plastic wheels with rubber tyres make the best drive wheels and are cheap and readily available.
- Both wheels need to be the same diameter.
- They need good grip.
- Axles should be aligned in the centre, and not slip.
Making your own is possible, but inadvisable. Instead, we recommend buying plastic wheels with tyres (search for this phrase with ‘robot’), available for less than £5, and often with the motors for not much more.
Castor wheel or ball
A castor wheel, ball, or skid is mostly on the robot to balance it, without causing too much friction. You can get away with a simple bottle lid facing down here or, for a better cheap hack, half a ping-pong-ball. You can buy robot castor wheel or roller ball assemblies for under £2.
The important thing is that this component does not introduce friction, and can easily be attached firmly to the robot.
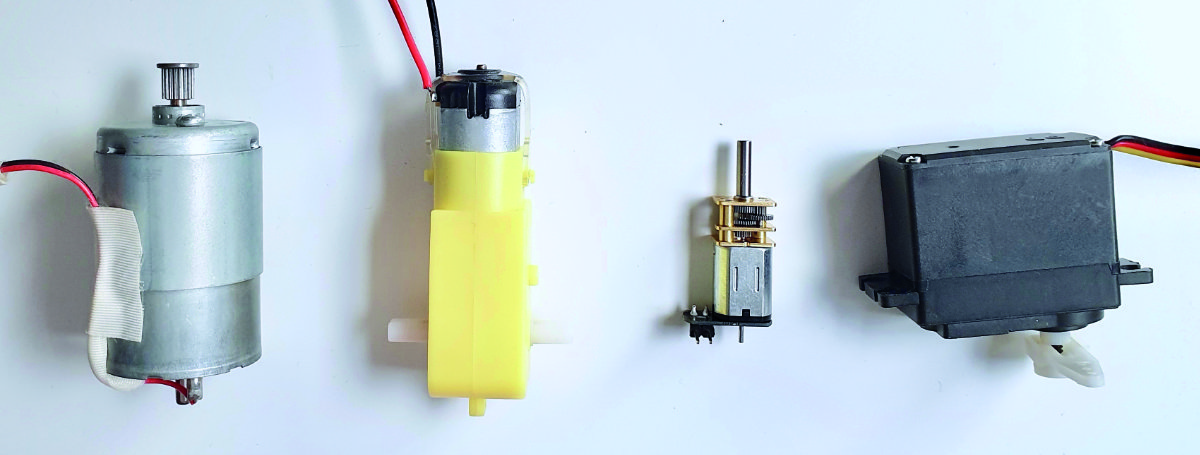
Types of drive motors
What kinds of motors are there?
- DC motors simply spin. They are cheap, but are easily stopped with any load.
- Stepper motors move in ‘steps’, a fraction of a full turn. They are not cheap, but can be salvaged from old printers and scanners.
- Servo motors can be moved to a particular position but not make a full revolution. They can be controlled directly from a Raspberry Pi. These can be modified for continuous rotation, but this can be complicated or expensive.
- DC gear motors combine a gearbox with a DC motor to drive heavier loads. They are cheap and easy to find. We recommend this option.
Choosing the gear motors
Buy motors with a gear ratio above 40:1. Although they’ll never match perfectly, get them in pairs, as motors that look similar may not have the same speed.
They come in plastic and metal geared flavours. Metal tends to last longer but cost more. Plastic gear motors are cheaper, but larger and not as sturdy. In most of our robots, plastic motors are fine.
90-degree motors fit better in a limited space. Ensure the axles match your wheels. Adapting axles adds complexity and cost.
Gear motors can be salvaged from an electronic toy like an RC excavator or tank.
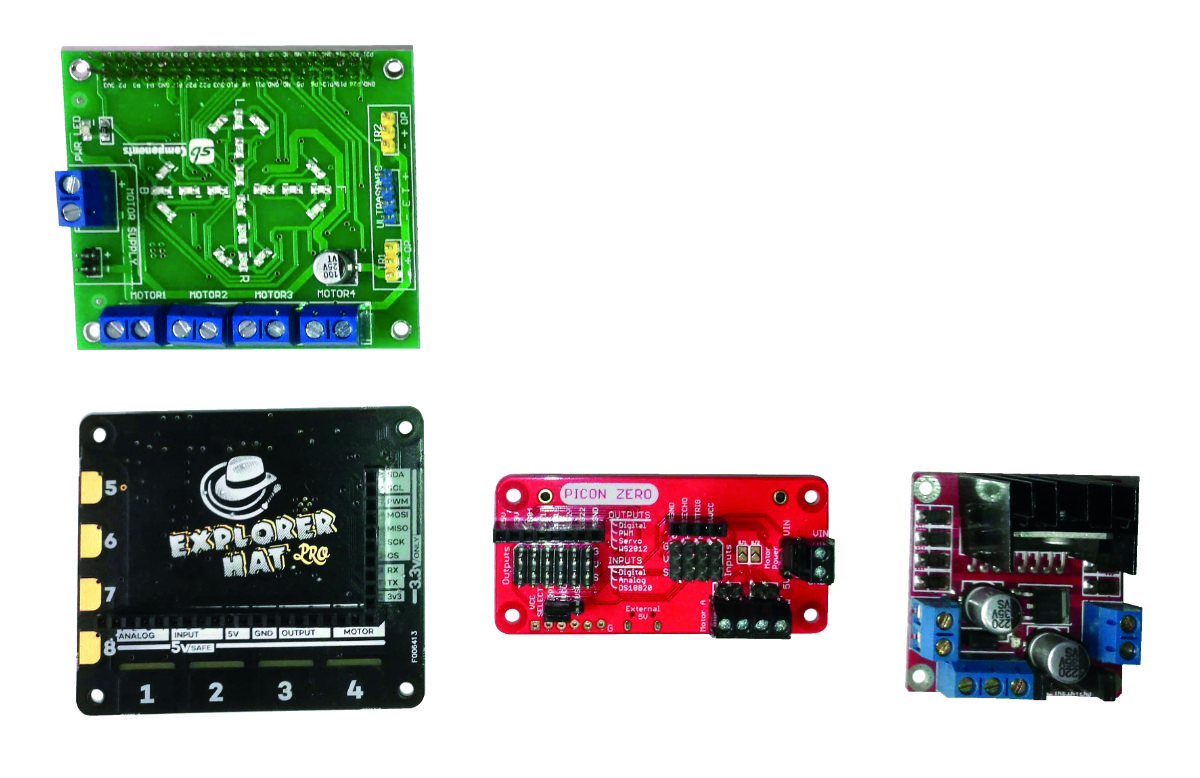
The motor controller
This connects your Raspberry Pi to the motors. Ensure it can control DC motors.
- Buy a Raspberry Pi HAT designed for motors. This is more expensive than other options, but may have additional functionality like logic shifting for sensors, servo motor control, or power regulation. It’ll cost £15–£25.
- A DC motor control breakout module. These should have two channels. The cheaper options tend to be based around the L298N or DRV8833 chips, good enough for our purposes. Should be under £8. A simple and reliable option.
- Someone with more electronics knowledge could construct their own H-bridges, but this probably won’t cost less than the DC motor modules.
Power up your robot
Robots need power for the motors and electronics. A Raspberry Pi needs a smooth 5 V to run, with upto 3 A capacity. Motors introduce noise that could interfere with your Raspberry Pi.
- Separate power, using a USB power bank for Raspberry Pi and other batteries for motors. Power banks can be pricey, but we’ve seen smaller ones given away at shows.
- A single set of batteries with a regulator like a UBEC (universal battery eliminator circuit). These can be bought to provide 5 V and more than 2 A. A UBEC can be found for around £6.
- LiPo/Li-ion are expensive and tricky, only recommended for experienced builders.
Add sensors to your robot
For more interesting code, a robot needs sensors to detect things. Those that don’t require extra conversion will save space and a little money. Be prepared to solder on headers.
- An HC-SR04P is a cheap way to measure distance. Line-tracking sensors let the robot follow lines.
A camera can be used to follow lines and detect certain objects optically. - An optical flow sensor looks a bit like a camera and lets you measure x-y movement, but cannot tell when you have turned.
- Motion sensors can tell you acceleration, rotation, and change in heading. 9DOF types are now around £12.
Tip! Shop around more
Prices on robot parts vary by up to ten times. Swap words like board for module, and robot for Arduino, in your searches.
Fasteners and wiring
For fasteners, the ‘standoff kits’ found online are great; get a selection of M2, M2.5, and M3 including the bolts, nuts, and spacers.
- Cable ties are cheap and handy. They can tidy up cabling but can also strap robot parts together.
Hot glue is handy for stopping things rattling around; however, don’t use it for load-bearing connections. Double-sided sticky tape, foam, and sticky tack can also be used this way. - Jumper wires are used to get signals and power between your components. We recommend getting male-to-female, male-to-male, and female-to-female jumper cable selections (for breadboarding). These will connect Raspberry Pi to most sensors and modules.
Tools to build a Raspberry Pi robot
The best way to keep costs down is to borrow tools – if you have a local hackspace, makerspace, or can talk to a college about using their facilities, you won’t need to buy all these tools.
- A hot glue gun has already been mentioned. Some kind of hand drill and a way to clamp parts will be needed for any custom building. DO NOT hold a part you are drilling in another hand!
- Also useful is small screwdriver set, and miniature spanners for fastening parts. We recommend needlenose pliers, side cutters, a multimeter, and a soldering iron.
This is the first part of a series of tutorials in which Danny shows us how to build a low-cost robot. Subscribe to The MagPi to get the next installment in print, or sign up to our newsletter for the free digital edition direct to your inbox.
[ad_2]
Source link
Emprendedor en el sector de los videojuegos, tecnologica y educación. + de 20 años en videojuegos. CEO de Hydra Interactive. Fundador de Devsfromspains.

![Buildbox Free - How To Make 2D Platformer Game [PART 1]](https://e928cfdc7rs.exactdn.com/info/uploads/sites/3/2020/01/Buildbox-Free-How-To-Make-2D-Platformer-Game-PART-150x150.jpg?strip=all)

